Thursday, June 19, 2008

Step 1 Find your pattern


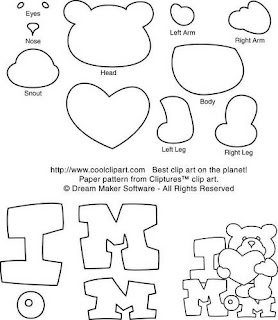
Find your pattern. You can find many free patterns online, by searching “paper piecing scrapbook” on Google. If you just search “paper piecing” you will get a lot of quilt patterns. Once you have more experience with paper piecing you will be able to turn virtually anything into a pattern. Coloring books, art design books, and clipart make great patterns. If you are not very artistic ..stick to designs that have very little freehand drawing for the features. This is an example of a pattern I found on the net.

Step 2 Cut your design


Cut your design. I personally use my craft robo to cut out the pieces. Long before my craft robo existed I did all the cutting by hand. If you are doing it by hand cut out the pattern first and then trace the pattern with pencil onto the colored cardstock of your choice. You want to use colors that correspond with that piece. ( for example if you are wanting to make a carrot you would use orange for the carrot and green for the greenery of the carrot) This is how the cut pieces look once they have been cut.

Step 3 Outline


Once you have all of your pieces cut out, outline them all. ( I like to use a grey Marvy Pen because it’s not as harsh as black )

Step 4 Chalk


Chalk all your pieces to add dimension and make them look real. I like to use pastel chalk pencils. Draw the chalk line around the border and then blend with an 'eyeshadow applicator" or q-tip. Not all pieces NEED chalking...I like to chalk body parts to make them look real.

Step 5 Draw in features


Draw in your features This is the hardest part. Remember if you mess up …you don’t have to redo your WHOLE project …just that piece. Creativity is freedom to make a mistake, but art is knowing which ones to keep.

Step 6 Embellish


Embellish
This is the fun creative part. Ask yourself what can I add to this to make it pop …or stand out ?? Jewels?? Flowers?? Stickles?? Lace ?? Eyelets?? Chalk for blush?? The sky is the limit!! Sometimes it is easier to embellish before you glue and sometimes after …you will know as you are creating.

Step 7 Piece and glue


Piece together and glue
You definitely want to use the original picture for this step. As far as what adhesive to use I like to use the Tombo Aqua clear glue. However for embellishments it might be necessary to use glue dots or spray adhesive.